Do you have a high tech water purifier at home?
If your answer is yes, then congrats! You are really fortunate for getting pure drinking water every day.
But today, I am not talking about the professional RO, UV or UF water purifier. Let’s go back to the roots, before all these high tech water purifiers were born.
Do you know that for several drought-hit villages in developing countries; getting pure, drinkable water is also a luxury? That’s sad!
After miles of walking and hours of searching; all they are getting is dirty, muddy water which you may not even feel like touching.
I am dedicating this article to my not so fortunate friends, who are struggling every day to fulfill their basic need of getting drinkable water.
*This post may contain affiliate links. Please see the Disclaimer to learn more.
There are basically 4 steps to purify water and to make it drinkable.
- Sedimentation
- Filtration
- Disinfection
- Safe water storage & handling
Let’s have a look at all of them one by one.
1. SEDIMENTATION
What is sedimentation?
Turbid water looks cloudy, dirty, or muddy.
Do you know why?
That’s because it contains sand, silt, and clay particles that float in the water.
So, in the 1st step of purification of water, we are going to make it look good and clear.
Sedimentation helps in reducing the turbidity of the water and also removing some pathogens.
How does sedimentation work?
It’s simpler than you think.
Most of the contaminants that make the water turbid are heavier than the water molecules.
So, by simply letting the water settle for some time, all these heavy contaminants get accumulated at the bottom. This reduces the turbidity to a great extent.
Basic Sedimentation:
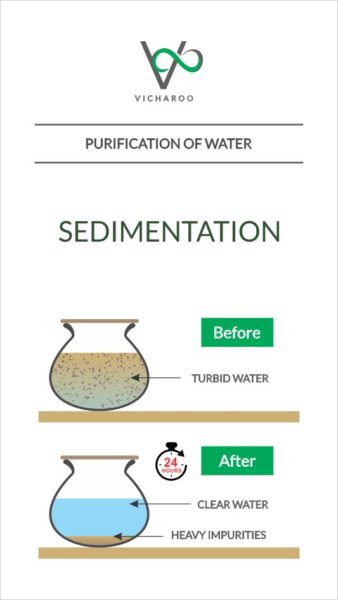
- Let a container of water (glass/ bucket etc.) sit without moving for 24 hours.
- Then pour the clear water into a clean container.
- Repeat the process for 2 to 3 times if needed.
- The water will look significantly cleaner.
Three Pot Method
Let’s learn one of the simplest ways to get better results with lesser efforts.
This basic water purification technique is ideal for regular use in rural/ remote area.
How three pot method works?
It’s like a ‘passing the parcel’ game. Remember how we pass pillow from one person to another? Same way, we are going to transfer raw water from one pot to another.
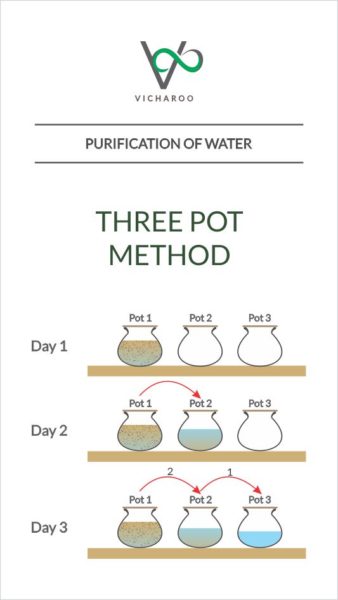
Basically, you will be needing 3 pots
On day 1,
- Fill the pot 1 with muddy water
On day 2,
- Most of the heavy impurities will get settled down at the bottom of the pot 1, making the water much clearer.
- Pour the same water from pot 1 into pot 2 without disturbing the water. (or else it will become turbid again)
- Later, wash the pot 1 to remove all the dirt and refill it with new muddy water
On day 3,
- Pour the water from pot 2 into pot 3 without disturbing the water.
- Wash the pot 2 and refill it with water from pot 1
- Use the water from pot 3 for drinking (post disinfection)
- Repeat the process every day.
In simple words,
- Pot-1 is for muddy water
- Pot-2 is for clear water
- Pot-3 is for drinking water (post disinfection)
Pro Tips:
- you can improve this method by using a straining cloth when pouring water into the containers.
- You can also use a flexible tube to siphon water from one pot to another. It will disturb less water than pouring.
- Don’t forget to wash the pots after each use.
Advantages of a 3 pot method:
- It is easy to use and cost effective
- It greatly reduces dirt and pathogens in the water
- Ideal for regular use in remote / rural areas
Disadvantages of 3 pot method:
- This method definitely improves the quality of the water. But it does not totally remove smaller suspended particles, pathogens and chemical contaminants.
- Disinfection is still needed to make the water potable
Sedimentation Using Coagulants
Do you think that 24 hours are too much to wait?
Want to make it quicker?
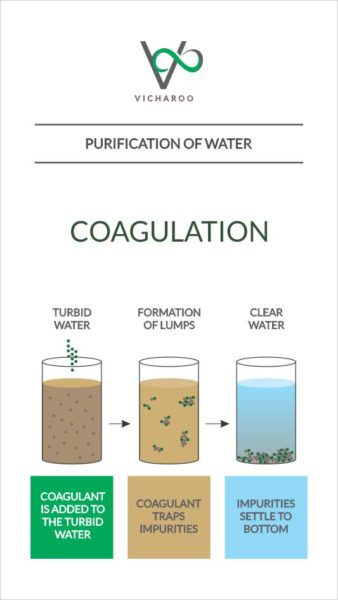
Then just add any coagulant to the water.
Coagulants are the substances which help in coagulation.
Still don’t understand anything?
Let me put it in simple words.
Coagulants help the sand, silt and clay particles to join together. This forms larger and heavier clumps. As a result, the impurities begin to settle at the bottom of the container within few minutes.
Coagulant? What’s that?
Some special chemicals and native plants can be used as coagulants to reduce the waiting time to approx. 2-3 hours.
Wow! That’s a lot quicker than waiting for 24 hours!
Chemical Coagulants:
Three common chemicals used as coagulants are:
- Aluminum sulphate
- Polyaluminum chloride (also known as PAC or liquid alum)
- Ferric sulphate
Natural Coagulants:
If these chemicals are not easily available in your area, don’t feel bad!
Some native plant seeds also can be used as coagulants. Great!
For example…
- Drumstick tree (Moringa oleifera)
- Clearing-nut tree (strychnos potatorum)
- Common bean (Phaseolus vulgaris)
- Prickly pear cactus (Opuntia)
- Fava beans (Vicia faba)
They have been traditionally used in some regions in Africa and Latin America to help with sedimentation.
How to use natural coagulants?
- Firstly, dry these plants/ seeds
- Grind them into fine particles
- Add this powder to the turbid water for coagulation
- Don’t forget to wash the container once the job is done
Bonus:
Crushed shells from the crab Scylla Serrata can eliminate up to 95% of copper and 85% of cadmium content from the water in 6 hours.
2. FILTRATION
Sedimentation can separate the heavy contaminants from the water. But light impurities such as plant debris, insects, light-weight dust particles may still float on the water.
Hence, filtration methods are commonly used after sedimentation to further reduce turbidity and remove the pathogens.
Filtration is a physical process which involves passing water through filter media.
There are various types of filters that are used by households around the world.
Cloth Filter
Cloth is one of the cheapest and the most easily available filter material. Fabric material such as linen, cotton, polyester and other fabrics are typically used by villagers for filtering water.
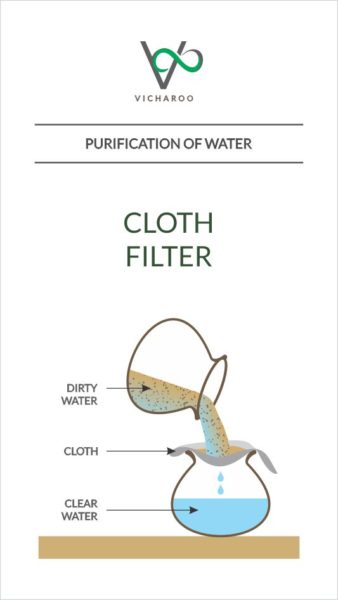
How to use a cloth filter?
- Use a clean piece of finely-woven, thin white cotton cloth or an old/ discarded garment as the filter medium.
- Fold the cloth into a few layers and tie it over a clean container
- Pour the water into it to strain out dust and other contaminants
- Wash the cloth thoroughly before using it again
- Replace the cloth as soon as there are any visible tears or holes
Pro Tip:
If the raw water is muddy and highly odorous…
- Mix wood ash of Sal tree (Shorea robusta)with water and then filtered through cloth.
Advantages of using a cloth filter to purify water:
- This method is most suitable for filtration of well water
- This filter is very easy to use and cost effective
- Old / discarded clean clothes can be used for filtering
Disadvantages of using a cloth filter to purify water:
- Not that effective in removing pathogens (bacterium, virus, or other micro-organism) and chemical contaminants of below 2 microns size.
- Not suitable for highly turbid water
Survival tip:
In case of emergency and lack of other resources, we can use the available materials for basic filtration.
It won’t make the water 100% clean, as it will still contain many impurities and pathogens even after filtering. But at least it’s better than not filtering it at all.
So, what can be used for basic filtration?
How to use your Bra to purify water in emergency situation?
- Ohh… I never thought of this earlier! Women can actually use their bra to filter the water.
- Generally bra has 2 layers of clothing. This can help in basic filtration. Due to its conical shape, water can be poured and filtered easily without spilling.
How to use coffee filter to purify water in emergency situation?
- Do you have coffee filters? Then you can use them to filter the dirty water. They are light weight and can filter the water efficiently.
- Once the filtration is done, used coffee filters can be used as toilet paper or as a fire starter.
Basic Sand Filter
Basic sand filter is one of the simplest form of sand filter. It’s generally used as a pre-treatment for purification of the water.
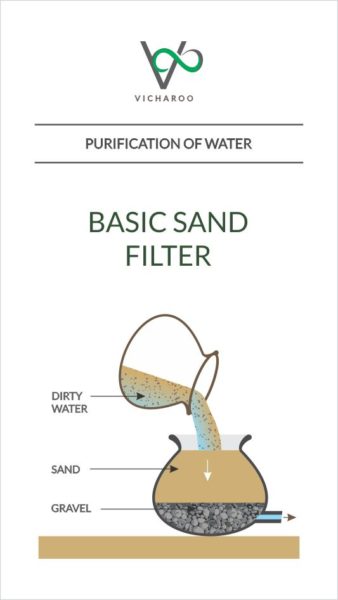
How to make a basic sand filter?
- Take any clean container with a spigot at the bottom
- Put some gravel in the container
- Fill rest of the container with sand
- Slowly start pouring raw water into the container
- Water will quickly get filtered through these 2 layers.
- Collect the filtered water in another container for further treatment like disinfection
Advantages of a basic sand filter:
- The setup is very simple and cost effective
- Flow rate is fast (you can filter more water in lesser time)
- Efficiently removes larger contaminants and some pathogens
- Makes disinfection more effective
Disadvantages of a basic sand filter:
- Pathogens and chemical contaminants are not removed completely.
- This method can be used only for the basic filtration or as a pre-treatment. Further treatment is needed to make water safe to drink.
Biosand Filter
Biosand filter is more sophisticated and effective water purifier.
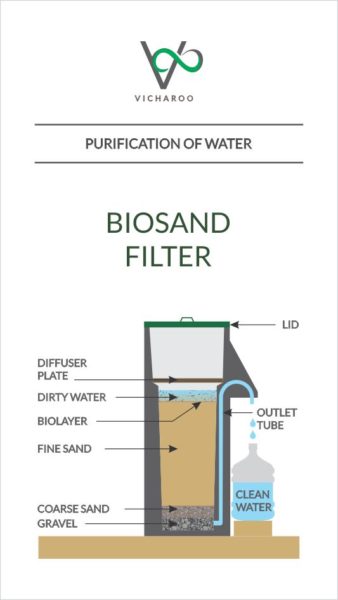
How does a biosand filter work?
The biosand filter is consists of various layers of filtration materials. These layers remove different types of impurities step by step.
1 Container:
- Take a container made up of concrete or plastic. (No matter if you use plastic or concrete, the filtering effectiveness will only be as good as the sand through which the water is filtered.)
- Pour the contaminated water into the top of the biosand filter.
2. Diffuser:
- The water poured into the top of the filter slowly drips through the holes in the diffuser.
- A diffuser reduces the impact of the splashing water. This protects the top of the sand and the biolayer from being damaged when water is poured into the filter.
3. Biolayer:
- A community of micro-organisms slowly starts growing on the top 1-2 cm of the sand.
- This invisible biolayer is the key component of the biofilter. It helps to remove some pathogens in the water and aids in treating the water better.
Note:
- The biological layer needs time to grow. It may take up to 30 days for the biolayer to fully form. Hence the filter will not treat water properly when it is first put into use and after cleanings.
- The raw water must not have been chlorinated, as the chlorine will kill the biolayer.
4. Fine sand:
- Specially selected and prepared filtration sand removes pathogens and suspended solids from water
5. Coarse sand:
- Supports the fine sand and prevents it from going into the drainage gravel
6. Gravel:
- Supports the coarse sand and prevents it from going into the outlet tube
7. Outlet tube:
- Once the water flows down through all the layers, it gets collected in the bottom of the filter. Gravity pushes the same water upwards which then flows out of the outlet tube
8. Lid:
- A tightly fitting lid is used to prevent contamination and pests in the water.
Filtered water is then disinfected to ensure the safest drinking water possible.
Pro Tips:
- The filter is most effective and efficient when operated intermittently and consistently.
- You can also add a layer of rusty nails to remove arsenic from the water.
- Higher turbidity levels plug the filtration sand layer more quickly and reduces the flow rate. Hence, the filter needs to be cleaned when it becomes clogged.
How biosand filter kills pathogens?
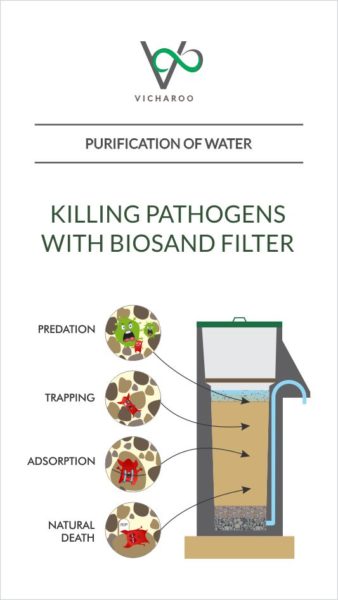
1. Predation:
Micro-organisms in the biolayer eat some pathogens
2. Trapping:
Some pathogens get trapped in the sand
3. Adsorption:
Some pathogens get stuck to the sand grains
4. Natural Death:
Some pathogens die from old age or because of the lack of food and air.
If built and operated properly, the biosand filter can effectively remove:
- Up to 100% of helminths (worms) & protozoa
- Up to 98.5% of bacteria
- 70-99% of viruses
- Up to 95% of turbidity (dirt and cloudiness)
- And iron (which turns water, laundry and food red)
Note:
- Without the biolayer, the filter can remove up to 30-70% of the pathogens through mechanical trapping and adsorption.
- The ideal biolayer will increase the treatment efficiency up to 99%.
Advantages of a biosand filter:
- Effective and long lasting (If properly maintained) method of household water treatment
- It can be used with any water source such as rainwater, well, bore well, rivers, lakes or other surface water.
- Easy to use
- As the filter works by gravity, no electricity/ fuel is required
Disadvantages of a biosand filter:
- Biosand filter cannot remove dissolved contaminants or chemicals, such as salt, arsenic or fluoride etc.
- The process is really slow, especially when the water is very dirty. It takes approx. 1 hour to get 12-18 litres (approx. 3-5 gallons) of filtered water
- Needs regular maintenance
- Skilled labour is required for the construction and maintenance
Tripod Filter-For Survival
This is kind of a primitive version of a sand filter.
This method is not as effective as RO / UV water purifier. But you can definitely use it if you are stuck in a remote area / forest and have no other way to filter the water.
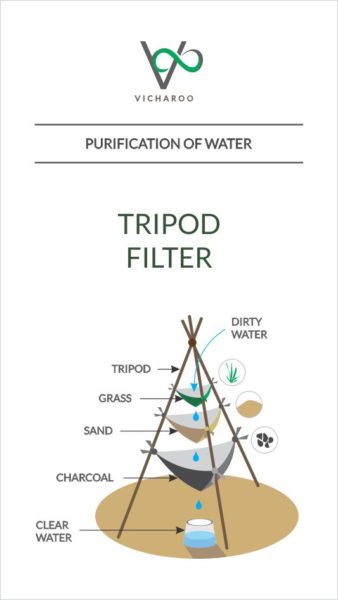
How to make a tripod filter?
- Simply make a tripod, by tying 3 sticks/ rods at the top.
- Use any available clean cloth like your T-shirt, handkerchief or bandanas.
- Make 3 levels of cloth filters as shown in the figure.
- In top part, place grass and very small twigs. They will catch most of the larger particles in your water sources.
- In the middle part, place sand. It will filter out even smaller contaminants that are not visible to the naked eye.
- Finally, in the last part, place charcoal to remove very fine particles and some pathogens.
- Pour the raw water in the top part.
- The water will become cleaner and cleaner as it drips through the three levels.
- Keep a container at the bottom of the last filter to collect filtered water
Pro Tip:
- Collected water will look much cleaner than the raw water, but don’t get tempted to drink it! It is not yet drinkable.
- You will still need to purify it by boiling or using any disinfection method to remove all the pathogens and make it safe to drink.
Sand Charcoal Filter-For Survival
This is more advanced and handy version of the bio-sand filter.
With the help of this method, you can even make the swamp water drinkable.
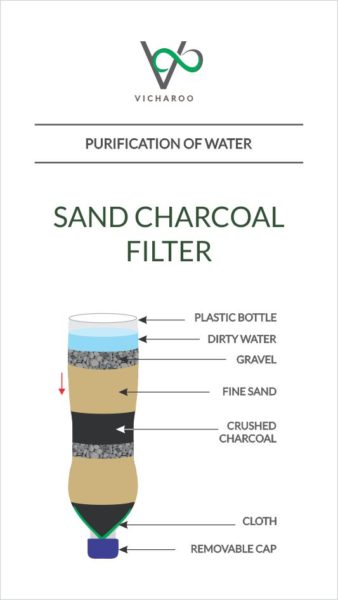
How to make a sand-charcoal filter?
- Take a plastic water bottle and cut off the bottom
- Now turn this bottle upside down
- Put a tissue paper/ cloth to prevent the filter materials from falling down.
- Start making the layers as follows:
1st layer: Crushed charcoal
This layer helps to remove minute impurities, harmful pathogens and chemicals lingering in the water. (Finer the charcoal, better the filter will work).
2nd layer: Fine sand
(If possible, use the strainer to get fine sand particles). This layer filters out smaller particles in the water that the gravel was not able to catch.
3rd layer: Small pebbles/gravel
This layer filters the common impurities found in water such as small sticks, leaves, and some organisms. It also protects the system from water that splashes in.
5. Now, repeat the layers for as many times as you can. (More the layers, the better it will work.)
6. You can also put a piece of plastic on the top to reduce erosion while pouring the water.
7. Now, start pouring the water slowly on the top of the filter, and let it run through all the layers.
8. Collect the filtered water. It will look far clearer than the raw water.
Note:
- For better results, use this method post sedimentation.
- Disinfect the filtered water before drinking it.
Bonus:
If you add a layer of rusty nails, the iron oxide in the nails will help to efficiently remove the arsenic in the water.
Advantages of a sand charcoal filter:
- Effectively removes most of the contaminants
- Easy to carry and transport
Disadvantages of a sand-charcoal filter:
- Filtration rate is low
Siphon Method – For Survival
What if you have dirty water but nothing to filter it?
Would you drink it anyway?
Not a chance! Isn’t it?
If you get stuck in any such situation, then remember- even a broken plastic bottle and a piece of cloth is enough to save your life.
Looks impossible? Fortunately, it’s not!
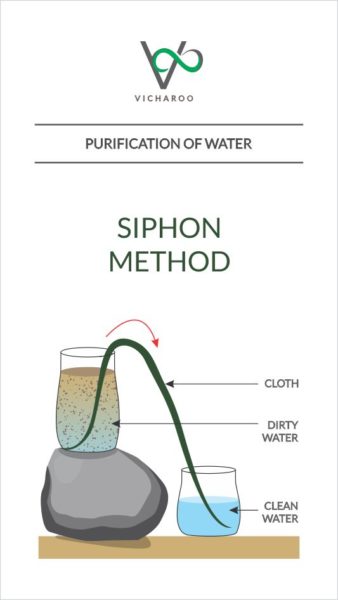
How to purify the water with siphon method?
- Take 2 containers and a long piece of cloth
- Place first container on the ground and second one on a higher level (with the help of stone / brick etc.)
- Fill the second container with dirty water
- Place one end of the cloth into the dirty water and second end into the empty container
- Cloth will soak water and transfer it from higher container to the lower one due to gravity
- This will leave all impurities, particles, organisms and microbes in the higher container
- All these impurities will reach the harder surface of the cloth and stick to it, whereas the water will keep moving along the cloth
- As a result, lower container will slowly get filled with clean water. This water can be used for drinking post disinfection
Note:
In case the water stops accumulating, there could be two reasons:
- The cloth is not reaching deep enough into the water
- Or if the cloth is too clogged up
So, just adjust the cloth properly and see if it is working or not. If it is still not working, then you can either clean the dirty cloth or use the new one.
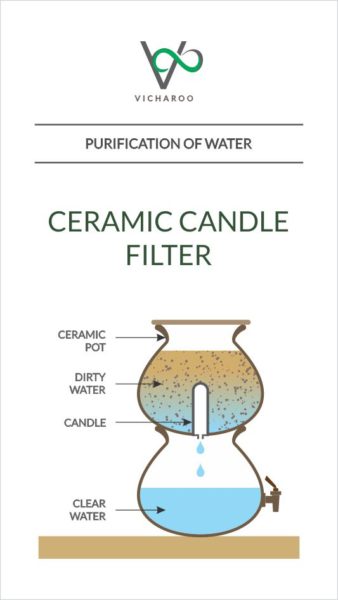
Ceramic/ Clay Pot Filter
Ceramic pot filter is suitable in areas where materials for biosand filters are not available.
This type of water purifier is very common in developing countries like Egypt, Cambodia, Nepal, Nicaragua, Africa and India etc.
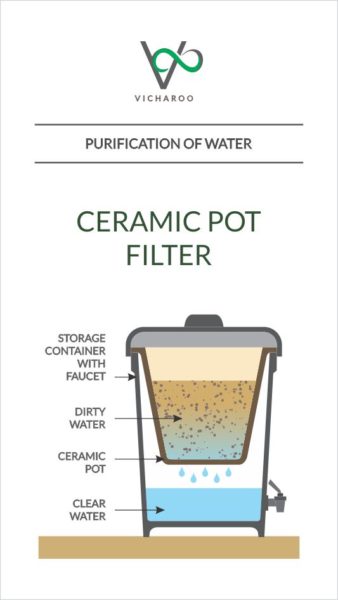
How to use a ceramic / clay pot filter?
Ceramic pot filter is consists of two containers. The upper unit filters the water, while a lower unit stores the treated water.
1. Production:
The upper unit of ceramic pot filters are usually made from clay mixed with laterite and a combustible material (like rice husks, sawdust, or coffee husks etc.)
When it is fired in a kiln, the combustible material burns. This leaves pores in the ceramic material.
Colloidal silver is sometimes used to help with pathogen removal. It also prevents the growth of micro-organisms.
2. Filtration:
Pour the turbid water into a ceramic pot/ clay jar and allow it to settle down.
The water in the jar will trickle through the porous clay wall of the jar
3. Storage:
Place another container (plastic or clay) at the bottom of the porous ceramic pot to collect water.
The lower container usually comes with a faucet at the bottom. It allows the users to withdraw the water for consumption. It also prevents re-contamination by contact with hands or other objects that could bear bacteria.
Advantages of a ceramic / clay pot filter:
- It’s simple to install, operate and maintain
- Very cost effective solution to remove turbidity and pathogens
- Provides safe storage to prevent re-contamination
- Does not require any energy supply to filter water
- The combustible materials like rice husks, sawdust, or coffee husks etc. are waste products and are readily available in rural areas. That’s why ceramic pot filters are easy to produce locally.
Disadvantages of a ceramic / clay pot filter:
- Chemical and heavy metal contaminants cannot be treated with basic ceramic water filters. Hence they are not suitable in areas, where primary health risk associated with source water is chemical such as arsenic, manganese, etc.
- Not effective against viruses
- Rate of filtration through ceramic pot is very slow
- Flow rate decreases with time due to clogging by suspended particles in the feed water
- Needs to be cleaned regularly to avoid clogging, especially when using turbid water or water containing iron
- Due to the limited flow rate and storage capacity, they are not ideal for water filtration on larger scale
- They need careful handling as they can break very easily, if dropped accidentally.
- Extreme cold water can shatter the filter in winter due to freezing and expansion
Ceramic Cartridge/ Candle Filter (CCF)
Ceramic cartridge or ceramic candle filters are similar to ceramic pot filters when it comes to materials and basic functioning.
The only difference is the addition of candle attached at the bottom of a container.
Pro Tips:
- Clogging in the filter can reduce the flow rate. Hence, scrub / clean the candle filter with a brush periodically or frequently depending upon the turbidity of the water
- You can even clean the candle filter in boiling water to kill germs caught in the filter
- The candle needs to be replaced once it gets worn away from scrubbing
Volcanic Stone Filter
This method is similar to ceramic/ clay filter. The only difference is that, the water is filtered using rock pores.
In countries like Peru (South America), where the volcanic stones are easily available, gravity based volcanic stone filters have been used since many generations.
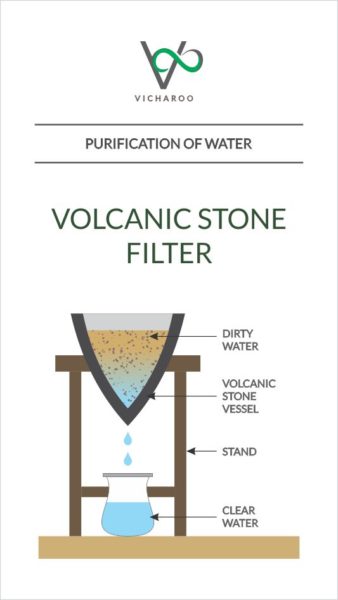
How volcanic stone filter works?
- A cone shaped basin is carved from limestone or volcanic stone. This serves as a water filter
- Once the basin is filled with water, the water slowly starts to filter through the porous rock.
- Water gets collected into the container placed below
- Such volcanic stone basins can filter about 1 litre (0.26 gallons) of water every 6 hours
Disadvantages of a volcanic stone filter:
- The rate of filtration is slow.
- This solution is area specific. You won’t get volcanic stone everywhere, right?
Jempeng Stone Filter
This is one of the most traditional methods of filtering water.
This technique was invented in Saringan batu Jempeng (Bali, Indonesia). It’s good to clarify and purify the muddy water from dug wells or from rice field irrigation channels.
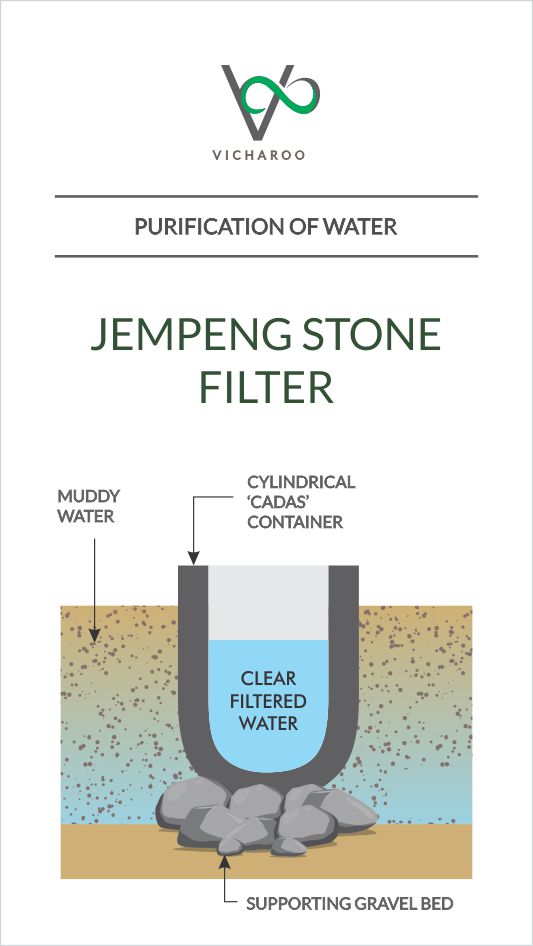
How does jempeng stone filters work?
In most of the filtration methods, we pour dirty water in a container for filtration.
But Jempeng stone filtration method is exactly the opposite. Here, the container is placed in a dirty/ muddy water.
- Jempeng stone filter unit is carved out of a porous material called ‘cadas’. It has an approximate wall thickness of 10–12 cm
- The unit is then placed on the top of a stone-supporting gravel bed in a pond or in the way of running water/ irrigation canal, which carries muddy water
- Muddy water gets filtered through the porous wall of the filter unit and gets collected inside.
Advantages of the jempeng stone filter:
- It is very cost-effective
- It can treat highly turbid water as well
Disadvantages of the jempeng stone filter:
- Speed of water filtration is relatively low
3. DISINFECTION
The next step in household water treatment is to remove or kill any remaining pathogens through disinfection. Turbid water helps pathogens to ‘hide’ from many disinfection techniques.
Hence, reducing turbidity by sedimentation and filtration is necessary to improve the effectiveness of these disinfection methods.
Boiling
Boiling is one of the oldest, simplest, most common, and highly effective methods for disinfecting water.
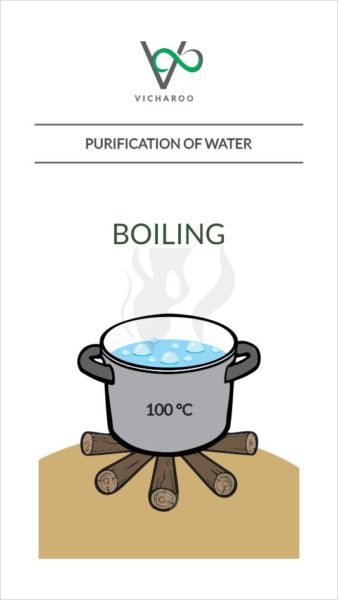
How to purify water by boiling it?
It only needs a container, fire and water.
- Simply heat the water until it reaches a full, rolling boil (at 100 °C).
- Continue to boil it for a minimum of 5-10 minutes.
- Soon, all those nasty little sickness-inducing micro-organisms will be dead.
- The longer the water is boiled, the purer it becomes
Pro Tip:
Boiling contaminated water removes all oxygen from the liquid. That’s why the resulting purified water often ends up tasting flat. But we can easily fix this. Do you know how?
- Simply shake the purified water up a bit or
- Add a pinch of salt for each litre of water boiled
Advantages of boiling the water:
- It’s very effective in killing all the pathogens. (bacterium, virus, or other micro-organism etc.)
Disadvantages of boiling the water:
- Fuel (wood, charcoal, biogas, kerosene, solar panels, electricity etc.) is required to boil the water. Hence, it’s operation cost varies depending on the type of fuel used.
- Boiling may cause burn injuries if proper precautions are not taken
- Water tastes flat after boiling
Solar Still
The concept is similar to the evaporation trap. If you have water, some basic stuff and most importantly-a good sunlight, then you can easily purify the water very efficiently.
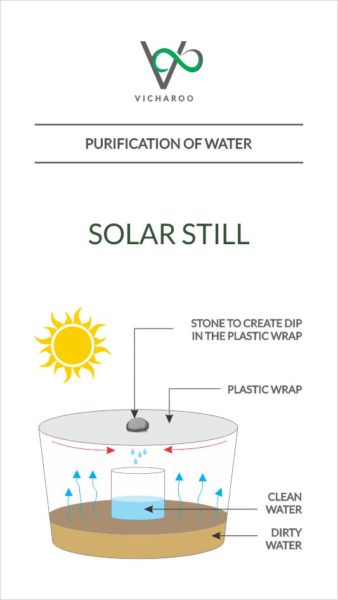
How to make a solar still?
- Take a big bowl or any suitable/ available container
- Fill approximately 1/3rd of the bowl with dirty (preferably pre-filtered) water
- Place the glass/ small container in the middle of the bowl. (It should be heavy, or else it will float on the water)
- Cover the bowl with clean plastic sheet/ wrap. (Do not use fabric, as it will absorb the water)
- Place a small rock in the middle of the wrap just above the glass to create a dip in the wrap
- Make sure that this setup gets a maximum sun exposure
- Now, just wait patiently or do your other chores and leave the rest on the mother nature. (It’s going to take a really long time!)
- During the process, water from the bowl evaporates and gets condensed on the plastic sheet. It then drips down into the glass due to the dip in a plastic sheet.
- If you are lucky enough to have a bright sunny day, soon enough, you will have a glass with clean water inside. But, is the water safe to drink? Yes, Off course!
Advantages of a solar still:
- Purifies water efficiently
- Cost effective
- Requires no electricity/ fuel
Disadvantages of a solar still:
- Process is very slow
- Rate of evaporation varies depending upon the weather conditions
Solar Disinfection (SODIS)
Solar disinfectant system uses solar radiations to purify the water. It is very effective and one of the easiest water purification techniques.
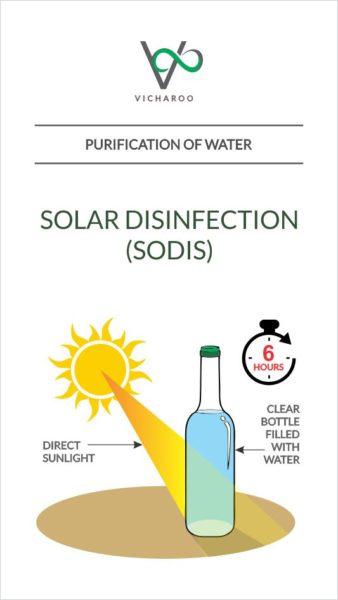
How to purify water with Solar Disinfection (SODIS) method?
- Take transparent, non-coloured glass bottles.
- You can also use plastic bottles made from polyethylene terephthalate (PET)
- Fill these bottles with clear water and place them in direct sunlight.
- Keep it there for approx. 6 hours on a sunny day or for up to 2 days when cloudy
- UV radiation of the sun will kill the pathogens in the water, and boom – you have safer water!
- Water can be used directly from the bottle to avoid re-contamination
Notes:
- It is ideal to use clear glass or food grade plastic bottle. But you can also use any clear soda bottle in case of an emergency
- The purification occurs from the exposure to UV rays. The outdoor temperature is irrelevant
- This method should only be used with clear water (post sedimentation & filtration)
- Old bottles with lots of scratches should not be used
- To speed up the process, fill the 3/4th bottle with water and shake it vigorously. Then fill the bottle completely and expose it to the sunlight.
Advantages of the Solar Disinfection (SODIS) method:
- It’s simple and cost effective
- Avoids the use of any fuel for heating
- Effective in removing pathogens
- Good for disinfecting water in small quantities with low turbidity
- Provides safe storage to prevent re-contamination
Disadvantages of the Solar Disinfection (SODIS) method:
- Not efficient in cloudy days
- Cannot be used in the rainy days and at night
Copper Vessel
Copper pot has been used in India since ages for water purification purpose. All you need is clear water, copper vessel and some patience.
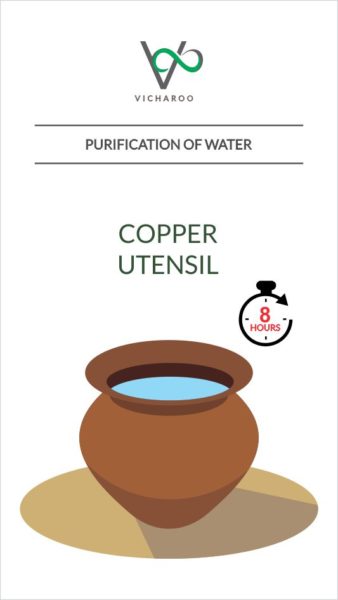
What happens when we store drinking water in a copper vessel?
As per Ayurveda, when water is stored in a copper vessel overnight (for over 8 hours), a very small amount of copper ions get dissolved into the water. In simple words, copper gets leached into the water in very small quantity.
This water is not only clear from pathogens, but also has many beneficial effects on our health. So, all you need to do is, keep the water in a copper vessel overnight and drink it very next day.
Advantages of storing drinking water in a copper vessel:
Purifies water:
- It kills pathogens like bacterium, virus, or other micro-organism. These pathogens can cause water borne diseases like Salmonella, typhus, cholera and Hepatitis A etc.
- Water stored in copper pots can eliminate E.Coli within 24 hours. Wow!
Health benefits:
Drinking water in a copper vessel provides amazing health benefits.
- It’s beneficial in digestive system related diseases (like ulcers, indigestion and infections etc.)
- Helps cleanse and detox your stomach
- Aids weight loss by breaking down fats and eliminating them more efficiently
- It helps to heal wounds faster due to its immense anti-bacterial, anti-viral and anti-inflammatory properties
- Promotes slow ageing by fighting with free radicals that cause the formation of fine lines and wrinkles
- Reduces the risk of cancer with its strong antioxidant properties
- Helps minimize risk of developing the heart diseases and hypertension
- Regulates the working of the thyroid gland
- Helps treat arthritis and inflamed joints with its very potent anti-inflammatory properties
- Enhances skin quality and melanin production
Disadvantages of storing drinking water in a copper vessel:
Side effects:
Excessive copper intake can result in copper toxicity. This can cause nausea, vomiting, abdominal and muscle pain. Hence, storing water in a copper vessel for too long, or consuming too much of water regularly should be avoided.
Needs regular cleaning:
Copper utensils stain and darken over a period of time due to Oxidation. Hence, keeping them looking new and shiny isn’t that easy.
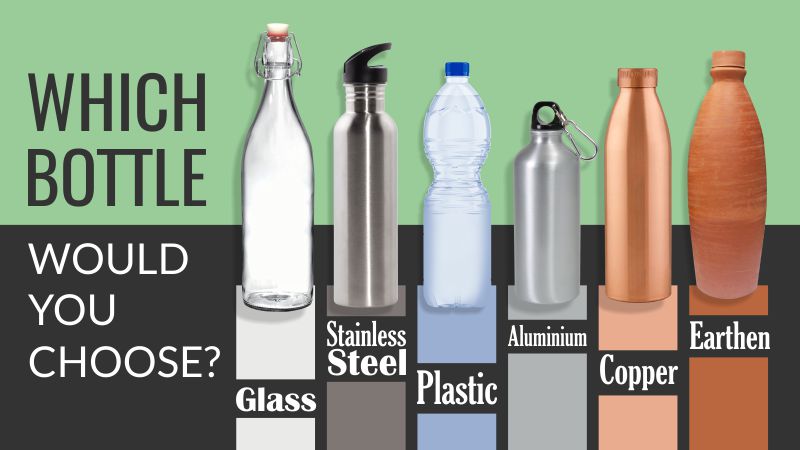
Nowadays, many attractive and easy to carry copper bottles are available online. There are also many other materials like glass, plastic, stainless steel, aluminium and clay etc. Want to know which bottle is best and good for your health?
Recommended Article:
Battle Of The Bottles- Which Water Bottle Is Best For You?
Water Purification Tablets and Solutions
Imagine, you are stuck in a situation, where you don’t have access to pure water. You are in a kind of hurry and have no resources to filter or boil the water available nearby. In such situations, water purification tablets and solutions are a good way to go.
Typically, Iodine solution, tablets or crystals and chlorine drops etc. are used for water purification.
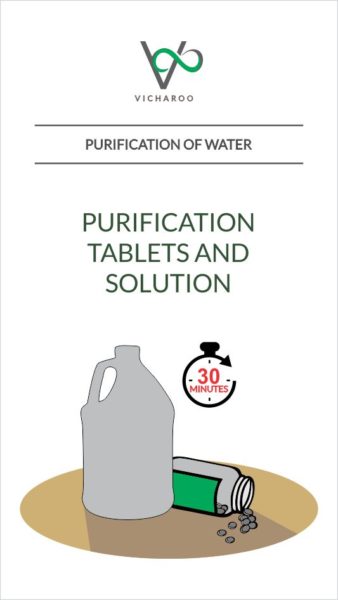
How to use water purification tablets and solutions?
- Just drop the iodine tablet / put sufficient chlorine drops into the water container
- Shake the container
- Wait for thirty minutes before you can drink the treated water
Piece of cake! isn’t it?
Advantages of using water purification tablets and solutions:
- Gets rid of the virus and bacteria that may cause illness
- They are very convenient, lightweight, easy to use and Portable
- Good for hikers, campers or post disasters (like flood, earthquake, hurricane etc.) when pure water is not readily available
Disadvantages of using water purification tablets and solutions:
- They change the taste of the water, which may be unpleasant for some
- You have to wait for about thirty minutes before you can drink the treated water
- They are not suitable for pregnant women
- Too much of drops/tablets can make the water poisonous
Hence, you have to be really careful before using this method. I would never recommend it unless it’s really necessary.
4. SAFE WATER STORAGE AND HANDLING
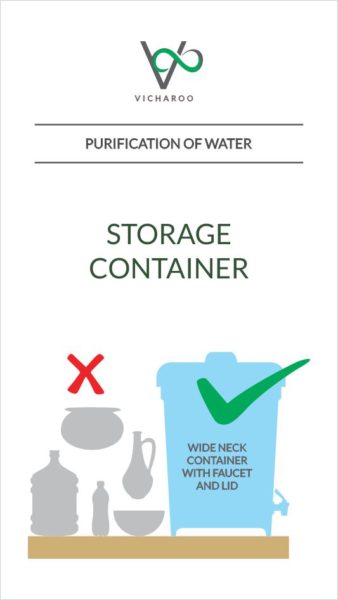
Which container is the best to store water?
Collecting, transporting and purifying the water is not an easy task. It takes a lot of time and energy to transform all of your dirty water into cleaner water.
So, once the water is clean and safe to drink, it should be handled and stored properly to keep it safe and avoid recontamination. Or else, all your efforts will go into vain and you may even end up inviting many water borne diseases. So, can we prevent the re-contamination? Off course!
Always remember…
Purified water is only as clean as its container.
Shape matters:
There are mainly 2 types of containers- Narrow necked and wide necked.
- Narrow necked containers prevent contamination, but are difficult to clean.
- Wide necked containers are easily contaminated, but are easy to clean.
- Hence, it is better to use a wide neck container with faucet and a closed lid to prevent contact with hands, cups and dippers. They are the main cause of contamination
Mind your material:
- People prefer using easily available containers like earthen pots, drums, bottles etc.
- In case you are using a plastic container, it can leech harmful carcinogenic chemicals into water.
- Hence, make sure to use food grade plastic. If it’s not possible, then at least avoid keeping drinking water in cheap plastic containers for too long.
Store and handle with care:
- Wash your hands prior to handling drinking water
- Tighten the caps on the tops of your water bottles / cover the containers with lid properly
- Clean the container regularly
- Store them in a clean, cool and dark (away from direct sun exposure) place.
- Keep them out of reach from children
Let’s have a look at some other really useful water purification devices…
SOME OTHER USEFUL AND LOW-COST WATER PURIFIERS
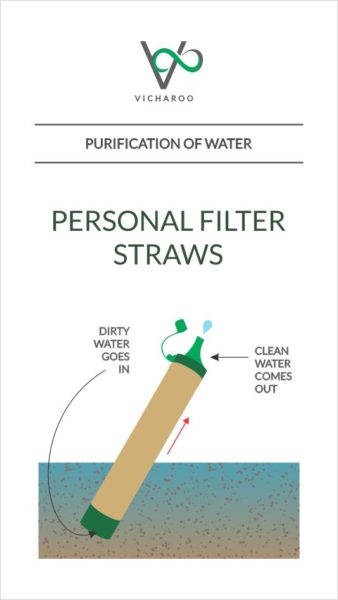
Personal Filter Straws
Personal filter straw is super handy and awfully easy to use.
It removes dirt and sediments, bacteria, viruses, parasites and finally filters out traces of chemicals. It’s powerful purification system can remove up to 99.99% of bacteria and many other parasites.
Hence, no matter how dirty the water is, this portable water filter enables us to drink safely in worst of the situations. One straw can safely filter approx. 1000 litres (264 gallons) of contaminated water.
Advantages of a personal filter straw:
- It can purify highly contaminated water
- Removes up to 99.99% pathogens
- Improves taste and smell of the water
- Requires no power/ fuel
- Easy to carry and maintain (simply blow into the device to avoid clogging)
Disadvantages of a personal filter straw:
- It can filter only small amount of water at a time
- It is better suited for emergency or temporary situations
- Although it is very cost effective than many other water purification methods, it is still not easily affordable and accessible for people from lower income group
Impact:
The invention has literally saved millions of lives in developing countries (Especially in South Africa) by providing safe drinking water. Personal filter straw is truly a great invention and a life saver!
Water Purifying Bicycle
Can purification of the water be as easy as riding a bike? With latest technology and innovative minds, it is possible!
Amazingly, it needs no horsepower-but your leg power to produce clean drinking water. Yes, you can actually convert raw water to drinking water just by pedaling a bicycle.
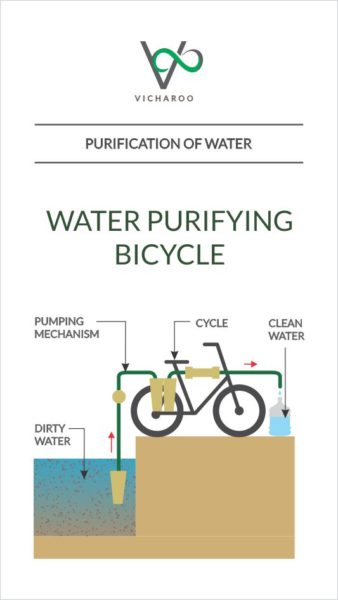
How water purifying bicycle works?
1. Find a source of water:
Ride the bike to any nearby source of water. Raw water can be obtained from rainwater, rivers, lakes, wells, swimming pools etc.
2. Start Peddling:
This bicycle comes with a water purifying equipment attached to its rear seat. It harnesses kinetic energy to purify water.
Just keep on pedaling to get clean water! It filters dirt, bacteria and smell from the raw water, achieving high quality purification.
3. Use it or share it with others:
So, what are you waiting for? Use the purified water for yourself, or simply take it away to any desired location by riding the same bicycle. How cool is that?
This way, a single person can easily purify and transport the water on his own for a family/ small community, which is difficult to reach by other vehicles.
Advantages of the water purifying bicycle:
- Requires no electricity/ fuel
- You can go to areas inaccessible by other types of larger vehicles
- Good for small local remote areas, and also in emergency situations like blackouts or natural disasters
- Easy to use and transport
- The pumping and purifying mechanism can be attached to any existing regular bicycle with some adjustments. This makes it very economical
Disadvantages of the water purifying bicycle:
- Sea water, gassy/ rotten water is not appropriate to be used as a raw water
- Filters need to be replaced frequently if the quality of raw water is very bad
Impact:
Depending upon the design and quality of the raw water, it produces approximately 6 litres (1.6 gallons) of drinking water per minute.
This is 3 times the amount of daily drinking water for a single person per day.
Some advanced bicycles can even produce water for 150 people in an hour. That’s a lot! Isn’t it?
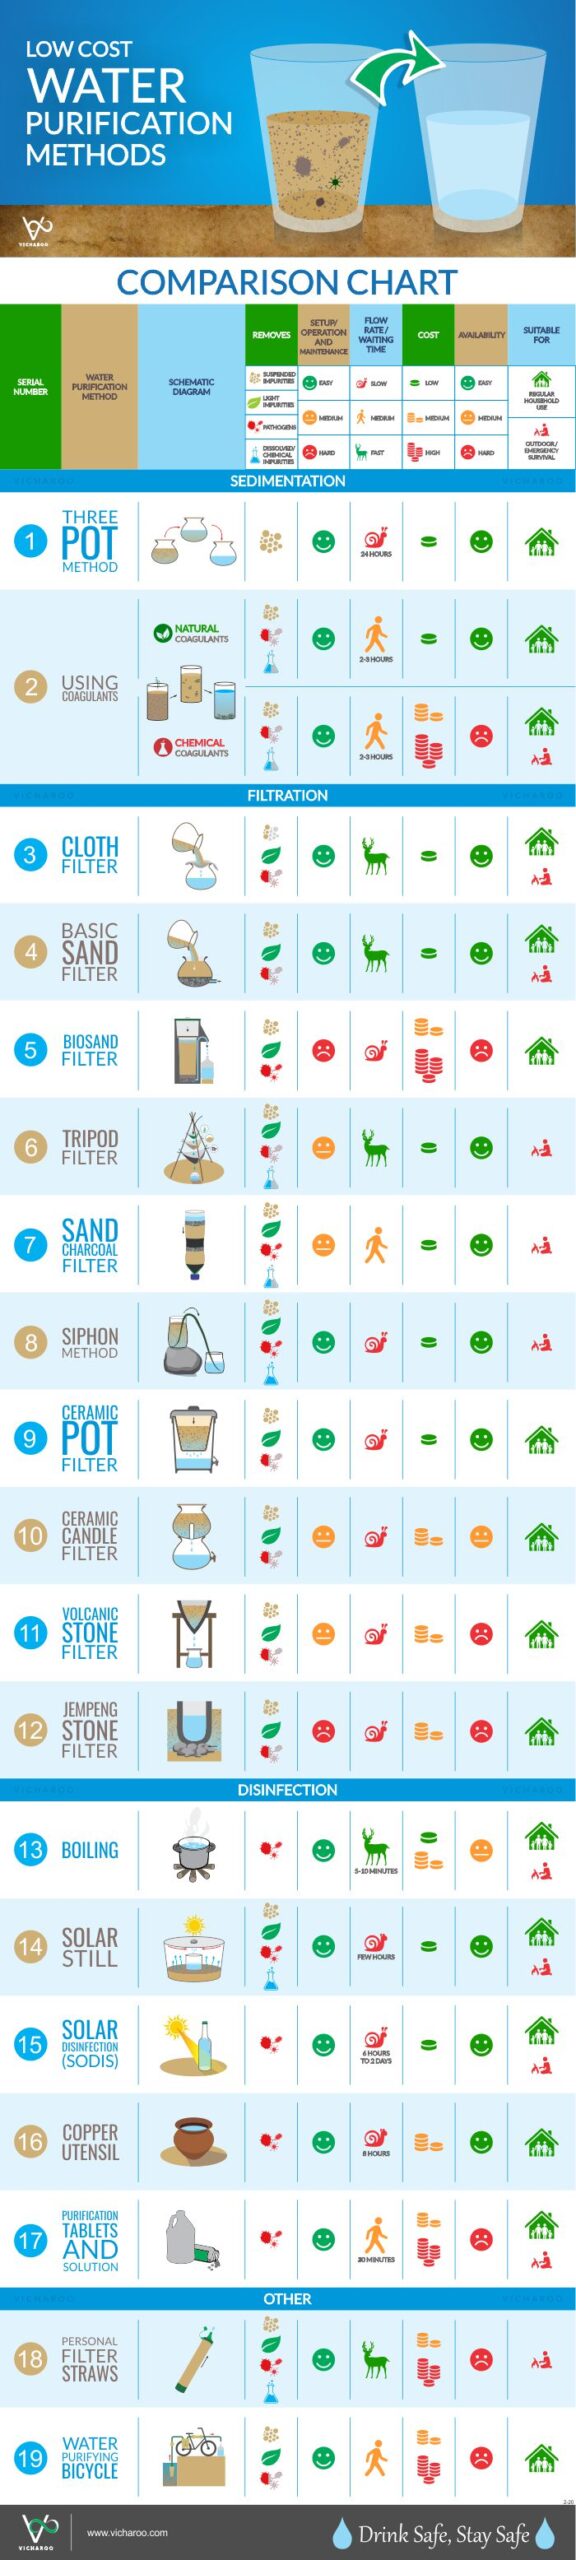
Comparison between various water purification methods
Are you confused about which water purification method to choose? Let’s compare them really quickly.
FAQs
Can you drink any water?
Water is undoubtedly a necessity for everyone; but that doesn’t mean you can drink any water that you find. Right?
Water is life. But just getting water is not enough, it has to be drinkable too. Or else, it can cause more harm than good by spreading various water-borne illnesses like Cholera, Diarrhoea, Hepatitis etc.
Raw water is consist of many contaminants and impurities. These impurities make the water unfit for drinking. Such unclean water can be as damaging and fatal as no water at all.
In many developing countries, thousands of people die every year because of the water-borne illnesses.
That’s what makes purifying the water before drinking is so important. Every single person should be aware of basic water purification methods.
Do we really need to know about water purification methods?
Well, yes. Even if you are living in a highly developed country with all the modern amenities, natural calamities spare no one!
We don’t know when the apocalypse will come. But once it strikes, it will be too late to start digging for a well.
There will be a water war for sure in the next few years. In fact, it has already begun in many areas. That’s really scary, isn’t it?
In such hard times, you may not get access to clean water or your regular water purifier.
Hence, it’s always better to know some very simple yet effective methods to purify water naturally. Makes sense, right?
These traditional and low cost solutions can be easily used for:
- Purifying water in rural communities and developing countries
- Getting drinkable water in emergency survival situations.
What are the characteristics of a good drinking water?
Rig Veda is one of the four sacred canonical texts of ancient India. As per Rig Veda, following properties make the water most appropriate and beneficial for drinking:
- Sheetham (cold to touch)
- Sushihi (clean)
- Sivam (Contains necessary nutrients, minerals and trace elements)
- Istham (transparent)
- Vimalam lahu Shadgunam (healthy acid base balance)
Why can’t we just use professional water purifier available in the market?
There are many water purifiers available in the market. But they have their own limitations and drawbacks.
Effectiveness:
- Efficiency of the water purifier to remove harmful metals and bacteria may vary widely between manufacturers and products.
Not that healthy:
- RO water purifier is good in removing dissolved impurities. But it also removes essential minerals that are required to the human body. This can cause a mineral deficiency.
- Removing the minerals can make the water acidic. This disturbs the pH balance in the blood.
Taste:
- As natural minerals are removed, water becomes tasteless.
Availability and cost:
- The initial cost of installation and maintenance of the professional water purifier could be higher as the filter must be changed
- In many developing countries, people do not have proper water supply and electricity at their home. They completely rely on water sources like wells, lakes and rivers.
- Hence, it may not be feasible for underdeveloped and poor communities to install such money intensive water purifier in their households.
- In emergency situations like natural disasters, you may not get the access and time to use the purifier.
- Some of the impurities such as pesticides may not be entirely removed.
Hence, it’s always better to know some very simple yet effective methods to purify water naturally.
Do we have to purify the water even if it looks perfectly clean?
Drinking dirty-muddy water is undoubtedly foolishness. It’s like giving an open invitation to many health risks. But what about the water that looks perfectly clear? Do we have to think twice before drinking it? Yes!
Bacteria and parasites are too small to be seen with the naked eye. Hence, they can live in water that looks clear too. In fact, these invisible micro-organisms could be thriving in such water by the millions. What!
Yeah…it’s true.
That’s why the clear water is not always drinkable.
If you drink such water, then you are putting yourself in a risk of vomiting, diarrhea, and other waterborne diseases. Hence, it’s always better to purify the water before drinking. It’s a must if you are staying in an area which is prone to waterborne diseases.
Don’t forget to purify the water especially…
- If your family all gotten a bit sick for no reason. This could be the sign of contamination in your drinking water source.
- Post natural disasters. Various natural disasters can cause industrial spills from factories. They can also damage and break sewage pipes. This results in many clean sources of water getting contaminated with all sorts of harmful pathogens and chemicals.
References
cawst youtube simplesurvival iwaponline eolss bestrowaterpurifier ifrc clean-water-for-laymen survivallife ndtv dailymail nipponbasic
Hello!
Thanks for reading. Hope you liked my collection. Do you have any suggestions, experiences or innovative ideas to share? They would be super helpful!
If you see anything that needs to be removed / updated or added, please feel free to drop your comments below. I read every single one, and I’d love to know!
You may also like:
- How to Find Water in an Emergency Situation? | Survival Hacks
- 18+ Easy & Low Cost DIY Water Purifiers
This is really helpful information. Thanks a lot for your post keep it up. Thank you so much!
It really helped me to improve my skills. i think this information lot more useful to the guys like me.